Before I start with the explanations let me say this. If you can master aperture you put into your grasp real creative control over your camera. In my opinion - aperture is where a lot of the magic happens in photography and as we’ll see below, changes in it can mean the difference between one dimensional and multi dimensional shots.
What is Aperture?
Put most simply - Aperture is ‘the size of the opening in the lens when a picture is taken.’
When you hit the shutter release button of your camera a hole opens up that allows your cameras image sensor to catch a glimpse of the scene you’re wanting to capture. The aperture that you set impacts the size of that hole. The larger the hole the more light that gets in - the smaller the hole the less light.
Aperture is measured in ‘f-stops’. You’ll often see them referred to here at Digital Photography School as f/number - for example f/2.8, f/4, f/5.6,f/8,f/22 etc. Moving from one f-stop to the next doubles or halves the size of the amount of opening in your lens (and the amount of light getting through). Keep in mind that a change in shutter speed from one stop to the next doubles or halves the amount of light that gets in also - this means if you increase one and decrease the other you let the same amount of light in - very handy to keep in mind).
One thing that causes a lot of new photographers confusion is that large apertures (where lots of light gets through) are given f/stop smaller numbers and smaller apertures (where less light gets through) have larger f-stop numbers. So f/2.8 is in fact a much larger aperture than f/22. It seems the wrong way around when you first hear it but you’ll get the hang of it.
Depth of Field and Aperture
There are a number of results of changing the aperture of your shots that you’ll want to keep in mind as you consider your setting but the most noticeable one will be the depth of field that your shot will have.
Depth of Field (DOF) is that amount of your shot that will be in focus. Large depth of field means that most of your image will be in focus whether it’s close to your camera or far away (like the picture to the left where both the foreground and background are largely in focus - taken with an aperture of f/22).
Small (or shallow) depth of field means that only part of the image will be in focus and the rest will be fuzzy (like in the flower at the top of this post (click to enlarge). You’ll see in it that the tip of the yellow stems are in focus but even though they are only 1cm or so behind them that the petals are out of focus. This is a very shallow depth of field and was taken with an aperture of f/4.5).
Aperture has a big impact upon depth of field. Large aperture (remember it’s a smaller number) will decrease depth of field while small aperture (larger numbers) will give you larger depth of field.
It can be a little confusing at first but the way I remember it is that small numbers mean small DOF and large numbers mean large DOF.
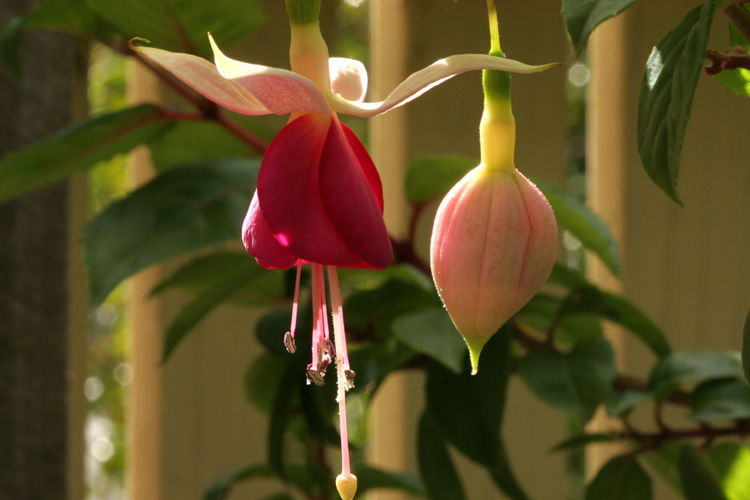
Let me illustrate this with two pictures I took earlier this week in my garden of two flowers.
The first picture below (click them to enlarge) on the left was taken with an aperture of f/22 and the second one was taken with an aperture of f/2.8. The difference is quite obvious. The f/22 picture has both the flower and the bud in focus and you’re able to make out the shape of the fence and leaves in the background.
The f/2.8 shot (2nd one) has the left flower in focus (or parts of it) but the depth of field is very shallow and the background is thrown out of focus and the bud to the right of the flower is also less in focus due to it being slightly further away from the camera when the shot was taken.

The best way to get your head around aperture is to get your camera out and do some experimenting. Go outside and find a spot where you’ve got items close to you as well as far away and take a series of shots with different aperture settings from the smallest setting to the largest. You’ll quickly see the impact that it can have and the usefulness of being able to control aperture.
Some styles of photography require large depths of field (and small Apertures)
For example in most landscape photography you’ll see small aperture settings (large numbers) selected by photographers. This ensures that from the foreground to the horizon is relatively in focus.
On the other hand in portrait photography it can be very handy to have your subject perfectly in focus but to have a nice blurry background in order to ensure that your subject is the main focal point and that other elements in the shot are not distracting. In this case you’d choose a large aperture (small number) to ensure a shallow depth of field.
Macro photographers tend to be big users of large apertures to ensure that the element of their subject that they are focusing in on totally captures the attention of the viewer of their images while the rest of the image is completely thrown out of focus.
No comments:
Post a Comment