Kenapa ada harga berbeza-beza di pasaran?
Ada yang mahal atas seribu , ada yang murah bawah 500 dan sebagainya?
1. Harga bergantung kepada kualiti peralatan-lensa yg digunakan dan gambar yg terhasil.
Peralatan seperti saya biasanya di Kuala Lumpur mereka akan menetapkan harga RM1500-RM2500. Tetapi saya duduk di kampung, saya menetapkan harga yang wajar bagi orang di kampung. Walaupun gambar saya belum lagi mendapat anugerah mana-mana pertandingan (ini kerana saya belum ada kesempatan dan komitmen utk turut serta).
Jika ada yg menetapkan bawah rm500 kebanyakkan mereka menggunakan teknologi lama, film SLR, kualiti Film SLR tidak sama dgn digital SLR. Kamera film SLR sangat murah berbanding digital. Kebiasaannya photographer film jarang menggunakan lense mahal.
2. Harga ditawarkan mengikut roll (1 roll= 36 keping), Upah & Pakej
Harga juga ditetapkan berasaskan jumlah kuantiti gambar yg ditawarkan, biasanya bersaiz 4R untuk majlis perkahwinan. Walaupun digital kita masih kira roll untuk memudahkan pemahaman. Harga semasa bagi 1 roll bergantung rapat kepada faktor no 1 di atas, yang menggunakan peralatan murah mereka akan charge paling murah rm180 hingga rm200 - 1 roll, jika peralatannya bagus harganya lebih mahal. Tetapi saya tidak menawarkan serendah 1 roll kerana majlis perkahwinan pada pendapat saya tidak layak untuk di gambarkan dalam 1 roll.
Upah
Ada photographer mengambil upah sehingga RM500 sehari untuk menangkap gambar sahaja. Paling murah ialah RM350 sehari. Ini dalah upah untuk penat lelah peluh mereka kehulu kehilir.
Pakej
Pakej juga mengambil peranan dalam penetapan sesuatu harga. Jika ada custom album yang di tawarkan dalam pakej, anda akan dapati harga servis menjadi mahal. Ini kerana photographer mengambil upah menyusun atur gambar dan edit untuk menjadikan satu album penuh.Upah custom album ditetapkan dari RM400 sehingga paling mahal RM800.
Memahami Kerja Photographer
Kerja mengambil gambar ini tidak mudah dan tidak pula senang seperti yang disangkakan. Bagi jurugambar yang mengambil keseluruhan majlis seperti saya, ia adalah kerja yang memenatkan dan kerja yang berpeluh, dari semua sessi, nikah, malam berinai, berarak, persalinan dan sebagainya. Sebagai seorang yang bekerja dan mempunyai gaji seperti saya, kerja mengambil gambar ini kerja yang berpeluh malah yang dipandang rendah orang walaupun peralatan mencecah belasan ribu ringgit tetapi tidak dihargai.Kenapa saya masih melakukannya, ini semua adalah kerana minat dan cuba memberikan yang terbaik kepada orang kampung.Jarang sekali orang kampung dapat gambar berkualiti tinggi yg dihasilkan dari lensa-lensa mahal. Jika ada yang berbunyi di belakang saya hanya akan memekakkan telinga dan terus saja menjalankan tugas tanpa mempedulikan mereka ini.
Kemudian semua shot ini di proses untuk dijadikan gambar kerana shot yang diambil adalah format RAW dan kemudiannya di proses(EV, contrast, saturation dan lain-lain) satu per satu menjadi gambar(jpeg). Jika gambar di ambil dlm format jpeg kualitinya akan jatuh bila kita adjust semula setting2 tersebut di photoshop.
Kenapa kekadang gambar kahwin saya gelap dan tak cukup warna?
Ini mungkin kerana printer di kedai gambar menggunakan kertas murah, catridge murah dan biasanya printer besar ini susah hendak mendapatkan komposisi warna yang sama dengan monitor.
Gambar Film boleh edit? Digital tak boleh?
Ini adalah satu penipuan alaf baru, gambar digital adalah lebih senang dan lebih bagus untuk di edit kerana ia format digital dan terus masuk ke komputer, sebelum menjadi gambar format RAW yang disunting di komputer tidak menurunkan kualiti. Tetapi gambar film terpaksa di cuci di bilik gelap kemudiannya di scan, jika scanner yang digunakan tidak berkualiti, gambar pun tidak berkualiti dan akan mempunyai noise, selepas itu baru gambar di edit dan di betulkan yg akan meragut kualiti gambar tersebut.
Saya harap dengan adanya artikel ini para pelanggan dan pelawat laman blog ini lebih memahami kerjaya seorang photographer majlis perkahwinan dan tahu membandingkan harga dan kualiti gambar.
Sila lawati link Pakej saya untuk mengetahui harga pakej saya yang terkini.
Wednesday, October 22, 2008
Privacy Policy
Privacy Policy for www.http://www.dzulfotografi.blogspot.com/
If you require any more information or have any questions about our privacy policy, please feel free to contact us by email at dzulfotografi@yahoo.com.
At www.http://www.dzulfotografi.blogspot.com/, the privacy of our visitors is of extreme importance to us. This privacy policy document outlines the types of personal information is received and collected by www.http://www.dzulfotografi.blogspot.com/ and how it is used.
Log Files
Like many other Web sites, www.http://www.dzulfotografi.blogspot.com/ makes use of log files. The information inside the log files includes internet protocol ( IP ) addresses, type of browser, Internet Service Provider ( ISP ), date/time stamp, referring/exit pages, and number of clicks to analyze trends, administer the site, track user’s movement around the site, and gather demographic information. IP addresses, and other such information are not linked to any information that is personally identifiable.
Cookies and Web Beacons
www.http://www.dzulfotografi.blogspot.com/ does use cookies to store information about visitors preferences, record user-specific information on which pages the user access or visit, customize Web page content based on visitors browser type or other information that the visitor sends via their browser.
Some of our advertising partners may use cookies and web beacons on our site. Our advertising partners include Google Adsense, .
These third-party ad servers or ad networks use technology to the advertisements and links that appear on www.http://www.dzulfotografi.blogspot.com/ send directly to your browsers. They automatically receive your IP address when this occurs. Other technologies ( such as cookies, JavaScript, or Web Beacons ) may also be used by the third-party ad networks to measure the effectiveness of their advertisements and / or to personalize the advertising content that you see.
www.http://www.dzulfotografi.blogspot.com/ has no access to or control over these cookies that are used by third-party advertisers.
You should consult the respective privacy policies of these third-party ad servers for more detailed information on their practices as well as for instructions about how to opt-out of certain practices. www.http://www.dzulfotografi.blogspot.com/'s privacy policy does not apply to, and we cannot control the activities of, such other advertisers or web sites.
If you wish to disable cookies, you may do so through your individual browser options. More detailed information about cookie management with specific web browsers can be found at the browsers' respective websites.
Tuesday, October 21, 2008
How to Photograph Fireworks Displays
Fireworks Displays are something that evoke a lot of emotion in people as they are not only beautiful and spectacular to watch but they also are often used to celebrate momentous occasions.

I’ve had many emails from readers asking how to photograph fireworks displays, quite a few of whom have expressed concern that they might just be too hard to really photograph. My response is always the same - ‘give it a go - you might be surprised at what you end up with’.
My reason for this advice is that back when I bought my first ever SLR (a film one) one of the first things I photographed was fireworks and I was amazed by how easy it was and how spectacular the results were. I think it’s even easier with a digital camera as you can get immediate feedback as to whether the shots you’ve taken are good or not and then make adjustments.
Of course it’s not just a matter of going out finding a fireworks display - there are, as usual, things you can do to improve your results. With 4 July just around the corner I thought I’d share a few fireworks digital photography tips:1. Use a Tripod

Perhaps the most important tip is to secure your digital camera to something that will ensure it doesn’t move during the taking of your shots. This is especially important in photographing fireworks simply because you’ll be using longer shutter speeds which will not only capture the movement of the fireworks but any movement of the camera itself. The best way to keep your camera still is with a tripod (read our series on tripods and how to use and buy them). Alternatively - keep in mind that there are other non Tripod options for beating camera shake.
2. Remote Release
One way to ensure your camera is completely still during fireworks shots is to invest in a remote release device. These will vary from camera to camera but most have some sort of accessory made for them. The other way of taking shots without touching your camera is to use the self timer. This can work but you really need to be able to anticipate shots well and its very very hit and miss.
3. Framing Your Shot
One of the most difficult parts of photographing fireworks is working out where to aim your camera. The challenge you’ll face in doing this is that you generally need to aim your camera before the fireworks that you’ll be photographing goes off - anticipation is key. Here are a few points on getting your framing right.

- Scope out the location early - Planning is important with fireworks and getting to the location early in order to get a good, unobstructed position is important. Think about what is in the foreground and background of your shots and make sure you won’t have people’s heads bobbing up into your shots (also consider what impact you’ll have on others around you also). Take note of where fireworks are being set up and what parts of the sky they are likely to be shot into - you might also want to try to ask some of those setting up the display for a little information on what they are planning. Also consider what focal lengths you might want to use and choose appropriate lenses at this time (rather than in the middle of the show).
- Watch your Horizons - One thing that you should always consider when lining up fireworks shots is whether your camera is even or straight in it’s framing. This is especially important if you’re going to shooting with a wide focal length and will get other background elements in your shots (ie a cityscape). Keeping horizons straight is something we covered previously on this site and is important in fireworks shots also. As you get your camera on your tripod make sure it’s level right from the time you set up.
- Vertical or Horizontal? - There are two main ways of framing shots in all types of photography, vertically (portrait) or horizontally (landscape). Both can work in fireworks photography but I personally find a vertical perspective is better - particularly as there is a lot of vertical motion in fireworks. Horizontal shots can work if you’re going for more of a landscape shot with a wider focal length of if you’re wanting to capture multiple bursts of fireworks in the one shot - but I don’t tend to go there that often.
- Remember your framing - I find that when I photograph fireworks that I spend less time looking in my viewfinder and more looking at the sky directly. As a result it’s important to remember what framing you have and to watch that segment of the sky. Doing this will also help you to anticipate the right time for a shot as you’ll see the light trails of unexploded rockets shooting into the sky.
4. Focal Length?

One of the hardest parts of photographing fireworks is having your camera trained on the right part of the sky at the right time. This is especially difficult if you’re shooting with a longer focal length and are trying to take more tightly cropped shots. I generally shoot at a wider focal length than a tight one but during a show will try a few tighter shots (I usually use a zoom lens to give me this option) to see if I can get lucky with them. Of course zoomed in shots like the one to the left can be quite effective also. They enable you to really fill the frame with great color. Keep in mind however that cropping of your wider angle fireworks shots can always be done later to get a similar impact in your photography.
5. Aperture
A common question around photographing fireworks displays is what aperture to use. Many people think you need a fast lens to get them but in reality it’s quite the opposite as the light that the fireworks emit is quite bright. I find that apertures in the mid to small range tend to work reasonably well and would usually shoot somewhere between f/8 to f/16.
6. Shutter Speed

Probably more important to get right than aperture is shutter speed. Fireworks move and as a result the best photographs of them capture this movement meaning you need a nice long exposure. The technique that I developed when I first photographed fireworks was to shoot in ‘bulb’ mode. This is a mode that allows you to keep the shutter open for as long as you hold down the shutter (preferably using a remote shutter release of some type). Using this technique you hit the shutter as the firework is about to explode and hold it down until it’s finished exploding (generally a few seconds).
You can also experiment with set shutter speeds to see what impact it will have but I find that unless you’re holding the shutter open for very long exposures that the bulb technique works pretty well.
Don’t keep your shutter open too long. The temptation is to think that because it’s dark that you can leave it open as long as you like. The problem with this is that fireworks are bright and it doesn’t take too much to over expose them, especially if your shutter is open for multiple bursts in the one area of the sky. By all means experiment with multiple burst shots - but most people end up finding that the simpler one burst shots can be best.
7. ISO

Shooting at a low ISO is preferable to ensure the cleanest shots possible. Stick to ISO 100 and you should be fine.
8. Switch off your Flash
Shooting with a flash will have no impact upon your shots except to trick your camera into thinking it needs a short exposure time. Keep in mind that your camera’s flash will only have a reach of a few meters and in the case of fireworks even if they were this close a flash wouldn’t really have anything to light except for some smoke which would distract from the real action (the flashing lights).Switch your flash off.
9. Shoot in Manual Mode
I find I get the best results when shooting in manual exposure and manual focus modes. Auto focusing in low light can be very difficult for many cameras and you’ll end up missing a lot of shots. Once your focusing is set you’ll find you don’t really need to change it during the fireworks display - especially if you’re using a small aperture which increases depth of field. Keep in mind that changing focal lengths will mean you need to need to adjust your focusing on most lenses.
10. Experiment and Track Results

Throughout the fireworks display periodically check your results. I generally will take a few shots at the start and do a quick check to see that they are OK before shooting any more. Don’t check after every shot once you’ve got things set up OK (or you’ll miss the action) but do monitor yours shots occasionally to ensure you’re not taking a completely bad batch.
Also experiment with taking shots that include a wider perspective, silhouettes and people around you watching the display. Having your camera pointed at the sky can get you some wonderful shots but sometimes if you look for different perspectives you can get a few shots that are a little less cliche and just as spectacular. Most of the best shots that I’ve seen in the researching of this article have included some other element than the fireworks themselves - whether it be people, buildings, landmarks or wider cityscape perspectives.
Introduction to Aperture in Digital Photography
Over the last couple of weeks I’ve been writing a series of posts on elements that digital photographers need to learn about in order to get out of Auto mode and learn how to manually set the exposure of their shots. I’ve largely focussed upon three elements of the ‘exposure triangle‘ - ISO, Shutter Speed and Aperture. I’ve previously written about the first two and today would like to turn our attention to Aperture.
Before I start with the explanations let me say this. If you can master aperture you put into your grasp real creative control over your camera. In my opinion - aperture is where a lot of the magic happens in photography and as we’ll see below, changes in it can mean the difference between one dimensional and multi dimensional shots.
What is Aperture?
Put most simply - Aperture is ‘the size of the opening in the lens when a picture is taken.’
When you hit the shutter release button of your camera a hole opens up that allows your cameras image sensor to catch a glimpse of the scene you’re wanting to capture. The aperture that you set impacts the size of that hole. The larger the hole the more light that gets in - the smaller the hole the less light.
Aperture is measured in ‘f-stops’. You’ll often see them referred to here at Digital Photography School as f/number - for example f/2.8, f/4, f/5.6,f/8,f/22 etc. Moving from one f-stop to the next doubles or halves the size of the amount of opening in your lens (and the amount of light getting through). Keep in mind that a change in shutter speed from one stop to the next doubles or halves the amount of light that gets in also - this means if you increase one and decrease the other you let the same amount of light in - very handy to keep in mind).
One thing that causes a lot of new photographers confusion is that large apertures (where lots of light gets through) are given f/stop smaller numbers and smaller apertures (where less light gets through) have larger f-stop numbers. So f/2.8 is in fact a much larger aperture than f/22. It seems the wrong way around when you first hear it but you’ll get the hang of it.
Depth of Field and Aperture
There are a number of results of changing the aperture of your shots that you’ll want to keep in mind as you consider your setting but the most noticeable one will be the depth of field that your shot will have.
Depth of Field (DOF) is that amount of your shot that will be in focus. Large depth of field means that most of your image will be in focus whether it’s close to your camera or far away (like the picture to the left where both the foreground and background are largely in focus - taken with an aperture of f/22).
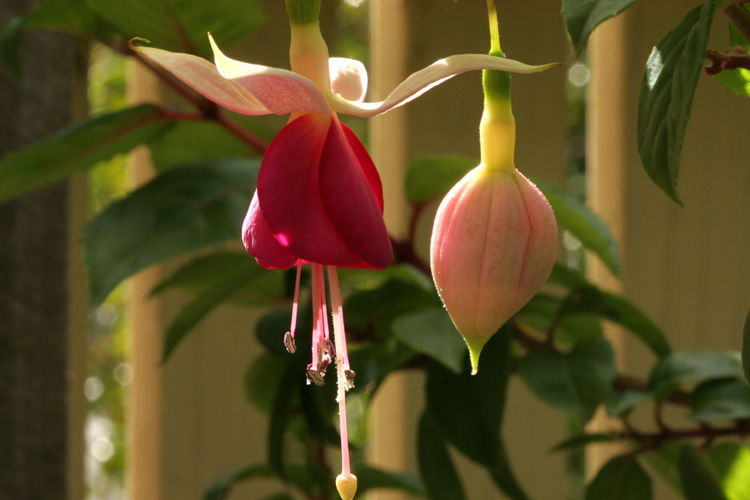
Small (or shallow) depth of field means that only part of the image will be in focus and the rest will be fuzzy (like in the flower at the top of this post (click to enlarge). You’ll see in it that the tip of the yellow stems are in focus but even though they are only 1cm or so behind them that the petals are out of focus. This is a very shallow depth of field and was taken with an aperture of f/4.5).
Aperture has a big impact upon depth of field. Large aperture (remember it’s a smaller number) will decrease depth of field while small aperture (larger numbers) will give you larger depth of field.
It can be a little confusing at first but the way I remember it is that small numbers mean small DOF and large numbers mean large DOF.
Let me illustrate this with two pictures I took earlier this week in my garden of two flowers.
The first picture below (click them to enlarge) on the left was taken with an aperture of f/22 and the second one was taken with an aperture of f/2.8. The difference is quite obvious. The f/22 picture has both the flower and the bud in focus and you’re able to make out the shape of the fence and leaves in the background.
The f/2.8 shot (2nd one) has the left flower in focus (or parts of it) but the depth of field is very shallow and the background is thrown out of focus and the bud to the right of the flower is also less in focus due to it being slightly further away from the camera when the shot was taken.

The best way to get your head around aperture is to get your camera out and do some experimenting. Go outside and find a spot where you’ve got items close to you as well as far away and take a series of shots with different aperture settings from the smallest setting to the largest. You’ll quickly see the impact that it can have and the usefulness of being able to control aperture.
Some styles of photography require large depths of field (and small Apertures)
For example in most landscape photography you’ll see small aperture settings (large numbers) selected by photographers. This ensures that from the foreground to the horizon is relatively in focus.
On the other hand in portrait photography it can be very handy to have your subject perfectly in focus but to have a nice blurry background in order to ensure that your subject is the main focal point and that other elements in the shot are not distracting. In this case you’d choose a large aperture (small number) to ensure a shallow depth of field.
Macro photographers tend to be big users of large apertures to ensure that the element of their subject that they are focusing in on totally captures the attention of the viewer of their images while the rest of the image is completely thrown out of focus.
How to Convert Color Digital Images into Black and White Ones
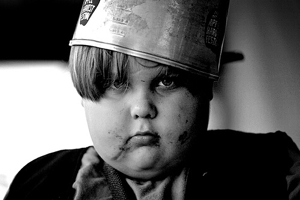
As part of our series of posts on Black and White Photography the following tip on converting images from color to black and white was submitted by DPS reader - Frank Lazaro. You can see his photography at his Flickr page. Please note that most of the shots in this post can be enlarged by clicking them.

Introduction
With the proliferation of digital photography, people have now started to look at ways to recreate what film has done for them, including recreating a black and white photo.
There are numerous ways to make a digital black and white, some include:
1. In camera filter - By changing a setting in the camera menu to take a black and white photo. Essentially this is a built-in color de-saturation method that removes the color information after the camera takes the picture. I won’t be covering this method in this article.
Pros: Easy, simple and does not require any knowledge or post processing to create a black and white photo.
Cons: Limits the contrast and dynamic range of the photos. In my personal experience, leaves the photo looking washed out or flat.
2. Post Processing - There are various methods in creating a black and white in a post processing environment.
I’ll cover several here. Please note, when I refer to Photoshop, I am using the generic term to mean using any photo editing tool with similar feature, such as Gimp or Photoshop Elements. There are also numerous plug-ins for Photoshop that will convert to Black and White as well. It is not possible; or rather I do not have the time to go over each one, so I will cover the ones that are the most popular in my opinion.
Using iPhoto or Google’s Picasa or Photoshop Elements. With in several of these tools, and even in the professional Photoshop products, there are built-in black and white filters. The benefits to these are they make creating a black and white photo as simple as one click. Granted some of the filters work better than others, but for the most part do a decent job.
Pros: Simple one step process to create a black and white photo
Cons: Requires the purchase or installing of additional software. Quality is hit or miss
Using Photoshop. Even within Photoshop there are multiple ways to create a black and white photo. I’ll only cover a handful of the popular methods, including my personal preferences.
To quick outline the methods, here is a quick list:
- Channel Mixer
- Lab Color Method
- Gradient Map
- Desaturation
Channel Mixer
The more popular way to convert a photo into black and white is using the Channel Mixer.
There is a common misconception though with this technique - the RGB percentages must equal 100%. The truth is they do not need to equal 100%, they can actually equal whatever you want them to be, since the main goal is to make sure the photo looks the way you want it to look.
When I have used this method before, I usually start with the following settings:
R: 70% G: 30% B: 5%
From there I adjust the settings until the photo looks the way I want it to.
How to convert using the Channel Mixer
First, open your photo and then add a Channel Mixer adjustment layer.

Select Monochrome and adjust the percentages for RGB. Again, I usually start with 70%, 30%, 5%.

Adjust the percentages until the photo looks good, don’t worry about great, we’ll get to that in a moment. You can also adjust the constant percentage to lighten or darken the photo. In this case I darkened the photo by setting the constant to -2%.
When done, click Ok
Now, duplicate that layer twice. If you flatten the photo, just drag the layer to the Create a New Layer Icon on the Layers window. If you prefer to not flatten, you’ll need to duplicate both the above layers. The easiest way to do this is by selecting both the adjustment layer and the photo and dragging them to the Create a New Layer Icon on the Layers window.

Click on the one of the duplicated photo layers.
Change the Screen Mode to Color Burn and reduce the opacity to something between 5% and 15% (personal preference).

Click on the other duplicated layer
Change the Screen Mode to Soft Light and reduce the opacity to something between 5% and 30% (personal preference).

Now the Photo should have more depth and not look as flat. You can adjust each of these layers based on the photo of your personal taste.
One thing I find useful is at the end to add a contrast layer, this will darken the darks and lighten the white. This is optional step.


Lab Color Method
This process has become a personal favorite of mine. It is rather simple, but does require the use of a robust post-processing application, such as Photoshop CS.
Open the file you want to convert.
Convert to Lab Color by going to Image>Mode>Lab Color

From the channel window (if it is not open, go to Windows>Channels) and select the Lightness Channel.

Select all by either going to the menu Edit>Select All or Ctrl-A or Cmd-A and copy the selection either through the menu or Ctrl-C or Cmd-C. Then convert back to RGB Mode, go to the menu Mode>RGB.

Go back to the Channel Window and select the Red channel. Paste either through the menu or Ctrl-V or Cmd-V.

Select the Green Channel and paste either through the menu or Ctrl-V or Cmd-V.

Select the Blue Channel and paste either through the menu or Ctrl-V or Cmd-V.

Reselect the top channel to make all the color channels visible again and you are done.

If for you feel the photo looks flat, you can use the duplicate layer method mentioned above. Just duplicate the main layer twice and follow these steps above.
If the photo is too dark, add an Levels Adjustment layer and lighten the photo.


To lighten the photo, I adjusted the center value and increased it to 1.20. The original value was 1.0. Too darken the photo, decrease the center number. To lighten, increase the center number.
Gradient Map
I don’t use this method all that much, but it is a pretty simple process.
Open the file you want to convert and add an Adjust layer. Click on Gradient Map. On the Dialog box, click on the pull down menu and select Black and White. Click Ok and you are done.


Desaturation Method
This method, in my opinion, leaves the photo looking flat. This is another simple method. Open the file you want to convert and add an Adjust layer. Click on Hue/Saturation. On the Dialog box, decrease the saturation value to -100%. Click Ok and you are done.


Conclusion
There is absolutely no right way to convert a digital photo to black and white. I have barely touch the surface in terms of how to and what kinds of software allow you to create a black and white photo. There are numerous plug-ins, methods, applications etc not mentioned here - but no one way is perfect. In the end, do what looks and works best for you and your photos. Enjoy.
10 Questions to Ask When Taking a Digital Photo
What goes through your mind in the moments as you raise your digital camera up to take a shot and before you press the shutter? If you’re like many digital photographers you’re not thinking about too much - you just want to capture the moment and then move on.
However getting in the habit of asking some simple questions can help take your images to the next level. Here’s 10 questions to get in the habit of asking while framing your shots. I’ve included links in each one to further reading on the topics. I hope you find them helpful:
1. What story am I telling?
This is an important question and one that should help you to make any number of decisions in terms of composition, framing, exposure etc. In essence what you’re asking is ‘why am I taking this shot? What is it’s purpose and what am I trying to convey?’ Is it purely a way to keep a record of a moment, are you trying to capture the emotion of a moment, is it possibly a shot to give to someone, is it part of a larger series of shots or will it be the only shot to commemorate the moment etc. Read more on telling stories with photos

2. What is the visual focal point of this shot?
What will viewers of this picture naturally have their eye drawn to in this scene? Once you’ve identified this focal point you can think about where to place it in the frame (consider the rule of thirds for example).
There are a variety of ways that you can enhance a focal point - some of which we explore here.

3. What competing focal points are there?
Once you’ve identified what you do want your viewers eyes to be drawn towards and have placed it in the frame - scan your eyes over the shot and see if there are any competing focal points and ask yourself whether they add to or take away from the image? Secondary focal points can add depth to shots but they can also be very distracting and so you might need to reposition yourself or adjust your focal length and/or depth of field to accommodate or remove them from your shots (read more on removing clutter from photography). Also keep in mind that if your shot has more than one focal point that it might be worth taking two shots, one of each focal point, in order to keep things simple.
4. What is in the background and foreground?
One of most common places for distractions in digital photography is the background of your shots. Run your eyes over the space behind your subject to see what else is in the image (do the same for the foreground). Consider whether you want the background in focus or nice and blurry.
Read more on getting backgrounds right.

5. Am I close enough?
Another common mistake in digital photography is taking shots where your subject is too small in the frame. Shots that fill the frame with your subject tend to be much more dynamic and show a lot more detail of your subject. To get this effect you have the option of moving yourself closer, moving your subject closer or using a longer focal length to give the effect of closeness.
Read more on filling your frame.

6. What is the main source of light?
Always give consideration to how your subject is lit. Without light you’ll lose detail and clarity in your image and your camera will have to compensate by doing things like increasing ISO and lengthening shutter speeds (which could lead to noisy and blurred images). What is the main source of light, where is it coming from, is there enough light, do you need artificial light sources (flash etc), do you need to stabilize your camera on a tripod to stop camera shake due to low light etc. Read more on using artificial light here and here as well as photographing moving subjects in low light conditions.
 Image by Darren Rowse
7. Is my Framing Straight?
It’s amazing how many otherwise good photos are spoiled by framing that is slightly offline. Sloping horizons and slightly leaning people or buildings should always be in the back of your mind to check. Read more on getting horizons horizontal and getting other lines straight.
Also related to this question is that of ‘Am I holding my Camera correctly?‘ Many people don’t and as a result suffer from camera shake and framing mistakes.

8. What other perspectives could I capture this subject from?
Put 10 digital camera owners in front of a scene and most of them will take exactly the same shot from the same position. Make your images stand out from the crowd by challenging yourself to not only take the standard shots that everyone else will get but to find creative and fresh angles and perspectives to shoot from.
Read more on adding variety to your Digital Photography.
 Image by Darren Rowse
9. How would holding the camera in the other format change this shot?
Many photographers get into the habit of always holding their camera the same way (horizontally/landscape or vertically/portrait). While it’s OK to have a preference one way or the other it’s also worth remembering that changing the format can drastically change the impact of the shot. Don’t forget you can also hold your camera at an angle for an effective result too.

10. How will the eye travel through this image?
This is related to asking about focal points but gets in touch with the fact that while you’re photographing a still image your viewers eyes don’t remain still as they look at an image. People tend to follow lines and are attracted to shapes and colors so considering all of these different visual elements and cues can help improve your shots considerably. Read more on horizontal, vertical and diagonal lines and how they impact a shot.
Of course you probably won’t remember all the questions and you’re unlikely to go through each of them with every shot you take - however next time you head out with your digital camera concentrate on asking yourself at least one or two of them as you take your shots. As you do you’ll find that they become more automatic and in time you’ll naturally take digital photography shots that take into account all of these elements.
10 Questions to Ask When Taking a Digital Photo
What goes through your mind in the moments as you raise your digital camera up to take a shot and before you press the shutter? If you’re like many digital photographers you’re not thinking about too much - you just want to capture the moment and then move on.
However getting in the habit of asking some simple questions can help take your images to the next level. Here’s 10 questions to get in the habit of asking while framing your shots. I’ve included links in each one to further reading on the topics. I hope you find them helpful:
1. What story am I telling?
This is an important question and one that should help you to make any number of decisions in terms of composition, framing, exposure etc. In essence what you’re asking is ‘why am I taking this shot? What is it’s purpose and what am I trying to convey?’ Is it purely a way to keep a record of a moment, are you trying to capture the emotion of a moment, is it possibly a shot to give to someone, is it part of a larger series of shots or will it be the only shot to commemorate the moment etc. Read more on telling stories with photos
2. What is the visual focal point of this shot?
What will viewers of this picture naturally have their eye drawn to in this scene? Once you’ve identified this focal point you can think about where to place it in the frame (consider the rule of thirds for example).
There are a variety of ways that you can enhance a focal point - some of which we explore here.
3. What competing focal points are there?
Once you’ve identified what you do want your viewers eyes to be drawn towards and have placed it in the frame - scan your eyes over the shot and see if there are any competing focal points and ask yourself whether they add to or take away from the image? Secondary focal points can add depth to shots but they can also be very distracting and so you might need to reposition yourself or adjust your focal length and/or depth of field to accommodate or remove them from your shots (read more on removing clutter from photography). Also keep in mind that if your shot has more than one focal point that it might be worth taking two shots, one of each focal point, in order to keep things simple.4. What is in the background and foreground?
One of most common places for distractions in digital photography is the background of your shots. Run your eyes over the space behind your subject to see what else is in the image (do the same for the foreground). Consider whether you want the background in focus or nice and blurry.
Read more on getting backgrounds right.
5. Am I close enough?
Another common mistake in digital photography is taking shots where your subject is too small in the frame. Shots that fill the frame with your subject tend to be much more dynamic and show a lot more detail of your subject. To get this effect you have the option of moving yourself closer, moving your subject closer or using a longer focal length to give the effect of closeness.
Read more on filling your frame.
6. What is the main source of light?
Always give consideration to how your subject is lit. Without light you’ll lose detail and clarity in your image and your camera will have to compensate by doing things like increasing ISO and lengthening shutter speeds (which could lead to noisy and blurred images). What is the main source of light, where is it coming from, is there enough light, do you need artificial light sources (flash etc), do you need to stabilize your camera on a tripod to stop camera shake due to low light etc. Read more on using artificial light here and here as well as photographing moving subjects in low light conditions.
Image by Darren Rowse7. Is my Framing Straight?
It’s amazing how many otherwise good photos are spoiled by framing that is slightly offline. Sloping horizons and slightly leaning people or buildings should always be in the back of your mind to check. Read more on getting horizons horizontal and getting other lines straight.
Also related to this question is that of ‘Am I holding my Camera correctly?‘ Many people don’t and as a result suffer from camera shake and framing mistakes.
8. What other perspectives could I capture this subject from?
Put 10 digital camera owners in front of a scene and most of them will take exactly the same shot from the same position. Make your images stand out from the crowd by challenging yourself to not only take the standard shots that everyone else will get but to find creative and fresh angles and perspectives to shoot from.
Read more on adding variety to your Digital Photography.
Image by Darren Rowse9. How would holding the camera in the other format change this shot?
Many photographers get into the habit of always holding their camera the same way (horizontally/landscape or vertically/portrait). While it’s OK to have a preference one way or the other it’s also worth remembering that changing the format can drastically change the impact of the shot. Don’t forget you can also hold your camera at an angle for an effective result too.
10. How will the eye travel through this image?
This is related to asking about focal points but gets in touch with the fact that while you’re photographing a still image your viewers eyes don’t remain still as they look at an image. People tend to follow lines and are attracted to shapes and colors so considering all of these different visual elements and cues can help improve your shots considerably. Read more on horizontal, vertical and diagonal lines and how they impact a shot.
Of course you probably won’t remember all the questions and you’re unlikely to go through each of them with every shot you take - however next time you head out with your digital camera concentrate on asking yourself at least one or two of them as you take your shots. As you do you’ll find that they become more automatic and in time you’ll naturally take digital photography shots that take into account all of these elements.
Subscribe to:
Posts (Atom)